
Arts & Crafts
How to Make a Beaded Necklace
Mar
The most eye-catching pieces of jewellery are beaded necklace. Because of their size and vibrant colours, they are simple to notice and admire. Despite this, they are the simplest jewellery tasks, as they simply require a few hand tools. The materials range from high-end pearls and emeralds to low-cost wood and seashells. There are plenty of other mineral, metal, and glass beads to choose from in between.
This is a fantastic method to begin started in jewellery creation, and many individuals limit themselves to just making beaded necklace. The talents are simple to learn and master for anyone with quick fingers. Although artistic instincts are advantageous, it is not necessary to be a Picasso to develop appealing bead combinations. Making beaded necklaces has only one disadvantage: it can be addictive. Many jewellers have more beads than they’ll ever use and more necklaces than they’ll ever be able to sell or give away.
Tools
All you need is a towel to lay out the beads and a pair of scissors to start beading. Most people, on the other hand, have a larger inventory. The tools that are used are listed below. You can gather them whenever you want.
Board of Beads
The groves on bead boards allow you to set down the beads during the design process. A straight board with a number of channels cut into it can suffice. A curving channel will be present on more expensive boards to help you visualise the finished necklace. Small slots for storing your parts, as well as inch marks, are handy features. The beads do not slide about as much on some of the boards since they are flocked.
Scissors
Scissors An excellent pair of scissors is a must-have. You must be able to cut cleanly and close to the knots. A standard pair of scissors will not enough, and your work will appear shoddy. Beadwork scissors are specialised scissors, and decent ones can be obtained in cosmetic sections.
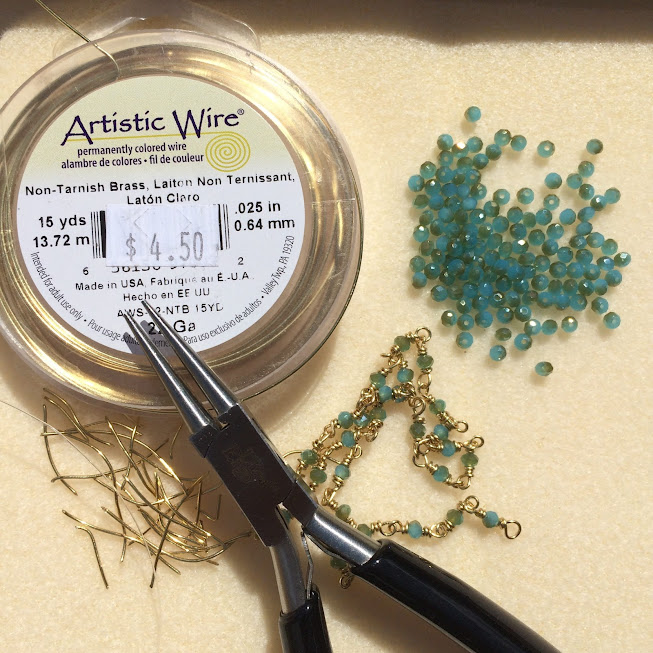
Pliers with a Round Nose
Round nose pliers are used to create wire loops. They’re also excellent for closing old loops, which you’ll do frequently. They are less likely to mark metal than other pliers since they are spherical and smooth.
Tweezers
Tweezers may save a lot of time and frustration when working with little beads. Instead of the flat points seen on ordinary tweezers, bead tweezers contain a tiny cup on the end.
Awl
An awl made specifically for beading can be purchased. The ones you’ll find at the hardware store are frequently too big and difficult to work with. An upholstery needle works well as a stand-in.
Yardstick
You must, of course, measure your necklaces.
Pliers for Crimping
You’ll need pliers to crimp the end beads if you’re working with wire. The job can be done with any little pliers, but those with smooth jaws are ideal. You can wrap the jaws of your existing pliers with tape instead of buying a new set.
Cutters for wires
Tiger tail necessitates cutting at the crimp. This task necessitates the use of a decent set of fine-tipped wire cutters.
Calipers
The design process is much easier when you know the size of your beads. You can rapidly calculate how many you’ll need if you know their size. Take a look at the graph below.
Reamer
This handy gadget will make stringing a lot more pleasurable. It’s just a needle with diamond grit on the outside. Beads with holes that aren’t straight or that are too small for your needle and thread are all too common. With a few twists of the reamer, the job becomes a lot easier.
Organizers

Let’s face it, if you start producing necklaces, you’ll end up with a lot of extremely small bits. It’s critical to keep them organised. Consider what would happen if all of your two and three millimetre gold beads were combined. Counting them would be impossible, and sorting them would be less than enjoyable. Small parts carriers come in a range of shapes and sizes. Get one before the need becomes overwhelming.
Materials
Finding appealing beads is the most straightforward aspect of constructing necklaces. Beads can be ordered through the mail from stores that specialise in them. Used necklaces can be found at garage sales and flea markets. They have unique items that you won’t find anywhere else.
There are times when you need to purchase beads for a certain project. Serious beaders, on the other hand, are continually on the hunt for unusual beads. The more ingredients you have on hand, the more likely you are to create a unique and enticing combination. However, this is also the most common beading blunder. You can get more beads than you’ll ever need. Keep in mind that crafting beaded necklaces can become addictive!
Beads come in a wide range of materials. The following are a few of the most prevalent.
Pearls
Pearls are the most classic of beads. Cultured pearls are available in many different sizes, shapes, and hues. Tahitian pearls are bigger and brighter in colour. Freshwater pearls are available in practically every hue imaginable. Their prices range from reasonable to very low.
Although pearls are typically used alone, don’t be afraid to combine them with other materials. When mixed with other materials, they can be eye-catching highlights.
Minerals
Beads are accessible in all gem materials. They range in price from the most expensive ruby, sapphire, emerald, and opal down to the least expensive cabbing materials including agate, hematite, and tiger-eye. There’s something for everyone’s taste and budget.
Metal
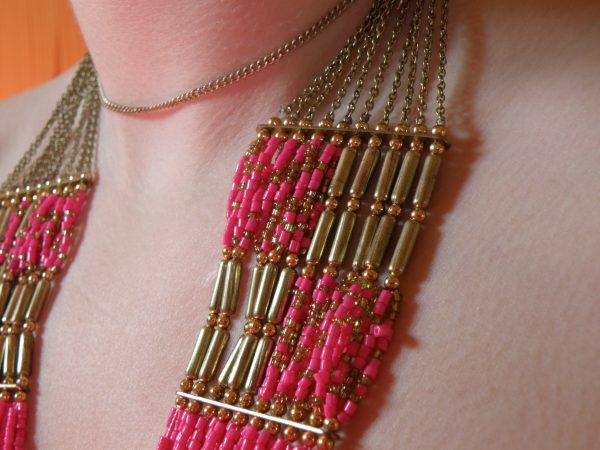
Metals are frequently utilised in necklaces. Metal clasps and bead tips are common connecting parts. Some gold beads are utilised as spacers, while others are so elaborate that they serve as centrepieces. Some necklaces are made entirely of beautiful metal beads.
The metal used is determined by the necklace’s value. The most popular metals are gold and silver, both solid and plated. Almost any other metal, such as iron, titanium, and pewter, is utilised on occasion.
Glass
Glass beads are an easy and affordable way to brighten up a necklace. Glass bead making, on the other hand, is a fine art form, with some beads fetching a few dollars each. Another appealing material for jewellers is hand painted glass beads.
Shell and Wood
Wood and seashells are both affordable materials. They are available in a range of colours, forms, and textures. Organic materials are appealing to a large number of individuals, and their popularity is always strong.
Shapes of Beads
Not only are there many different materials to choose from, but there is also a huge variety of shapes to choose from. Beads come in a variety of shapes and sizes, including round, oval, lentil, hearts, stars, tubes, triangles, wheels, chips, and chunks.
Tumble polished agate beads, also known as beggar beads, are irregularly shaped bits of agate. Carved beads are also available in a variety of gem materials.
Accessories
After you’ve got your beads, you’ll need the following items:
Cord
The traditional beading cord is silk cord. It has unrivalled strength and flexibility for a material of its size. Silk is being phased out in favour of nylon and polyester cords. They are virtually as strong as each other and have a longer lifespan.
Cord size is denoted by a number or a letter. The size of the cord you choose is determined by the size of your beads; larger, heavier beads necessitate a thicker cord.
Needles
Beading needles are simply a small piece of wire that has been twisted together and doubled over. When the holes are used, they get so tightly packed together that they are frequently discarded. Stringing kits come with a needle already attached to the end of the thread, or you may buy needles separately.
Glue
Glue your knots after they’ve been tied to keep them from unravelling. A variety of adhesives are used by beaders, but those that dry hard, quick, and transparent are preferred.
Tail of the TigerBeads
Tiger tail is a plastic-coated wire used to make extremely hefty beads. While most beads may hang gently from a thread, heavier beads will draw the thread taut and cause it to come to a point. They also necessitate increased strength for security reasons.
This is overcome by the use of wire. Heavy beads will hang gently on the wire and will not damage it. Coated wire is made by a variety of companies. Some are solely available to the industrial sector and are the most cost-effective in terms of volume.
Crimps
The tail of a tiger is not tied like a thread. Instead, the wire is threaded through a metal tube that is crimped shut. After that, the end is clipped close to the crimp.
Clasps
The clasp that keeps your necklace together says a lot about the piece’s quality. Precious metal clasps can add a significant amount to the price of a necklace, but they are typically well worth the investment. The organic appearance would be ruined by a filigreed gold clasp with wood beads. You must select your clasp with care.
A double strand of wire is used to make simple clasps. Make a hook out of part of the wire and an eye out of the rest. This is both practical and affordable. Wire hooks produced by hand go nicely with natural and organic designs.
Spring rings are a cheap option. Because they wear out faster than conventional clasps, they’re only suitable for low-cost jewellery. If you’re not sure which size to use, go for the larger and more durable option.
Clasps get significantly more ornate and pricey from here. Some even have valuable stones put in them. Choose a clasp that complements your design while staying within your budget. The appropriate clasp will substantially improve the piece’s overall quality and beauty.
Metal Objects
You’ll come across various metal pieces besides beads and clasps. A bead tip is a little cup with an extension attached to it. Their function is to conceal the knot.
To use a bead tip, thread the string through the cup first. Cut the extra after it has been knotted and bonded. After that, bend the arm through the clasp’s end. You’ve created an impenetrable tangle.
Another useful discovery is spacers. They serve to separate numerous strands. They are available with two to four holes. Select a metal that complements the other finds.
Design
While design ideas are absolutely personal, beginners should follow some basic standards. First, think about who you’re making the necklace for. For a young woman, a short necklace would be ideal, but not for a large, mature woman.
You should think about what it’s for. Is it going to be a formal item, something to wear to the theatre, or a colourful splash of gayness? Informal designs are often busy, with several sections and many colours, whereas formal patterns are usually straightforward.
Your budget may play a role in your decision. A superb pearl string is pricey enough to be a once-in-a-lifetime buy. Doubling the size will cost twice as much. Pearls are available in sixteen-inch strands with an eighteen-inch finish. If you want to build a twenty-two-inch necklace, you’ll need two strands of pearls plus some leftovers. Unless you have a use for the extra pearls, this should be avoided.
Take into account all of these aspects before deciding on a size and materials.
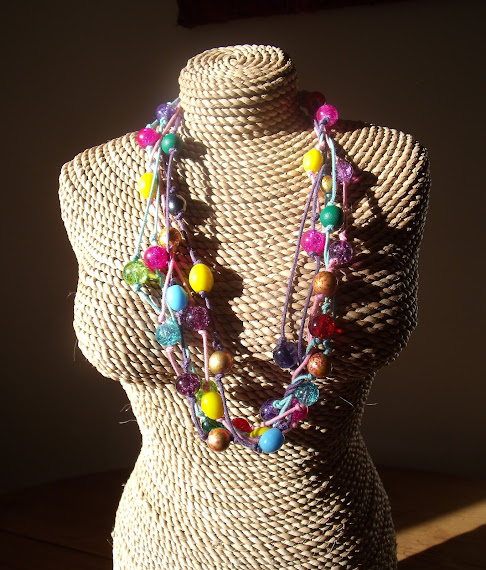
Pearls are beautiful on their own, but they aren’t suitable for most beads. I know a jeweller who scored a great deal on some high-end amethyst beads. He braided purple cord between each bead and strung them together into a lengthy rope. The materials and price were excellent, but it took years to sell. Although the materials were excellent, the design was uninteresting.
Consider the contrast when designing a necklace. Colors, forms, and textures that contrast create intrigue. Occasionally, simply interspersing little gold beads between your principal beads will suffice. In some circumstances, a centrepiece is appropriate. This is usually a solitary, stunning bead or a set of beads. A hanging centrepiece, such as a necklace or a loop of the same beads, can also be used as a centrepiece.
Using parts is a simple way to provide contrast and intrigue. Oval mother of pearl beads were used in one design that did well. It was made up of three parts: a green jade bead, an inch of red coral branches, and another jade bead, all of which were interwoven with gold. Blue lace agate with rose quartz and garnets with pearls are two other popular combos.
Shapes, such as the branch coral combined with oval and round beads, provide interest. You have many more alternatives when you use numerous strands.
A frequent and effective dangle is one made of the same or contrasting material. A heart, teardrop, cross, or star, for example, can transform an otherwise plain necklace. A carved jade or opal, or a decorative cabochon, can be found in more expensive pieces. You can even make a beaded necklace to showcase a gold-set faceted stone.
Techniques
The process of beading itself is simple, but your success is determined by your preparation. Start by gathering your supplies. Examine them to obtain a sense of what you wish to achieve. Then, on a bead board, sketch out your rough design.
Take a look at what you’ve got now. Do you have a pleasing colour, shape, and texture combination? Experiment with different combinations to see how they impact the design. Measure the parts once you’re satisfied. Is it the appropriate size for the job? Adjusting the size is usually as simple as adding or deleting a few beads around the clasp.
The final stage in the process is to select the appropriate cord. Choose a size that is thin enough to get through the beads while also being sturdy enough to support the weight. You should also think about the cord’s colour. Choose a colour that matches the primary beads if the beads are clear or if the knots are visible.
The art is finished after you have the right design. It’s just a matter of putting them together now. There are three main ways to put together a necklace.
Stringing Fundamentals
In and of itself, this is simplicity. Start with a needle and a length of string roughly half the length of your finished necklace. To keep the beads from slipping off the end, attach the other end to a clasp or bead tip. If you believe you’ll want to add more beads later, tie a knot rather than using a finding. After that, just thread the needle through the beads in the correct order.
Pick up the thread by the ends once all of the beads are on it. If you’re using a centre bead, be sure it’s in the centre. If you’re using other design elements, ensure sure they’re spaced evenly. It’s simple to add or remove a bead, and now is the time to remedy any errors.
The Knot’s Position
Finish by tying the loose end to a bead tip or the clasp’s other side. You must, however, decide where to tie the knot. To begin, hold the necklace by the ends and hang it. Make sure there is no slack in the thread by grasping it. You’ll notice that it’s taught; there isn’t enough thread for it to hang smoothly.
Release the ends of the necklace and spread it out in a circle. Pick up the thread by holding the ends. There will be some surplus thread visible when it hangs straight. The amount of thread that should be visible is around half of that excess. Tie the final knot an eighth of an inch above the last bead if you have a quarter inch of thread exposed. When worn, the thread will stretch somewhat to compensate for the discrepancy.
Apply a drop of glue to the knot to complete it. Many different brands are utilised. You should use a transparent adhesive that dries rapidly. Cut the end of the thread flush against the knot after the glue is dry.
Tail of the Tiger
It’s really easy to string with tiger tail. Begin by securing one end of the clasp to the wire as previously explained. With tiger tail, no needle is required; simply run it between the beads.
The knot is placed in the same way as a thread knot. You’re done when you crimp the final end together.
Knotting
For pearls and other expensive materials, this is the method of choice. There are two benefits to wearing a knotted necklace. One advantage is that if the necklace breaks, only one bead will fall off the string. The knots serve as a spacer as well. This prevents the beads from rubbing against one another and the ends from going flat. This is especially critical when working with pearls and other sensitive materials.
Gold beads can also be used as spacers. They have a cleaner appearance and take less time to complete than knotting. The approach you use is mostly determined by the necklace’s value. When it comes to pricey beads, the added security of knotting is well worth it.
Attaching one end of the thread to a bead tip, or clasp, is the first step in knotting. Make a loop in the thread after that. Through the loop, pass the end with the beads (or only the clasp for the first knot). This will result in a half-knot.
Make a hole in the knot with an awl. Gently move the knot down towards the bead with the awl. Pull the knot as tight as you can once it’s against the bead. Retighten the knot after removing the awl.
You still have the awl in the knot if it tightens before it reaches the bead. Wiggling the awl around will loosen the knot. Then repeat the process until it is in the proper place. It takes only a little practise to do well, and much less to do so quickly and gracefully.
Tie it off with no slack in the thread and a drop of glue on the knot once all of your beads are in place. After the adhesive has dried, trim the end flush.

Adding the finishing touches
You can do more to improve the attraction and value of your necklaces, no matter how lovely they are.
Most of the time, you will have excess beads. A set of matching earrings can be made by slipping a few beads on a shepherds hook. This adds little to the expense or labour, but a coordinated set has a lot of appeal.
Extra beads can sometimes be used to make a matching bracelet. A set of jewellery, once again, has far greater attraction than a single piece. This raises the value of your necklaces while also making them easier to sell.
The way you showcase your gems is the last touch. A velvet-covered necklace box has a lot of visual appeal. For some items, these are prohibitively pricey. Even if it isn’t as elegant as a white, cotton-filled box, it will suffice. The necklace is not visible in the embroidered pouches, but they provide an appealing wrapping that says, “This is unique.”
It takes time and effort to find the right packaging, but it is the finishing touch that may make or break a tran